Start
The IAPHUB Start component is required to initialize IAPHUB and load your products. It'll render an activity indicator until everything is loaded. If you're selling subscriptions it'll also detect if the user has an active subscription.
An app with an authentication system (login/signup screens) will have some extra steps to configure IAPHUB.
Having an authentication system has the advantage of being able to identify & search a user on the IAPHUB dashboard.
If you do not have an authentication system, you will not be able to search for a specific user and retrieve useful information such as the purchase history.
Create IAPHUB Start screen
Create a screen "IAPHUB Start". This screen will contain the "IAPHUB Start" component.
If your app doesn't have an authentication system, it should be the first screen displayed when your app starts (make sure the screen has the "Home screen" and "Welcome screen" navigation types).
If your app has an authentication system, it should be displayed right after the user is logged in (make sure the screen has the "Home screen" navigation type).
Configure login screen
This is only needed if your app has an authentication system.
Add a link action on your login form that will redirect the user to the "IAPHUB Start" screen when he's logged in.

Configure signup screen
This is only needed if your app has an authentication system.
You should also do the same for the form of your signup screen. Add a link action that will redirect the user to the "IAPHUB start" screen when the user is registered.

Configure Logged In User iaphubId property
This is only needed if your app has an authentication system.
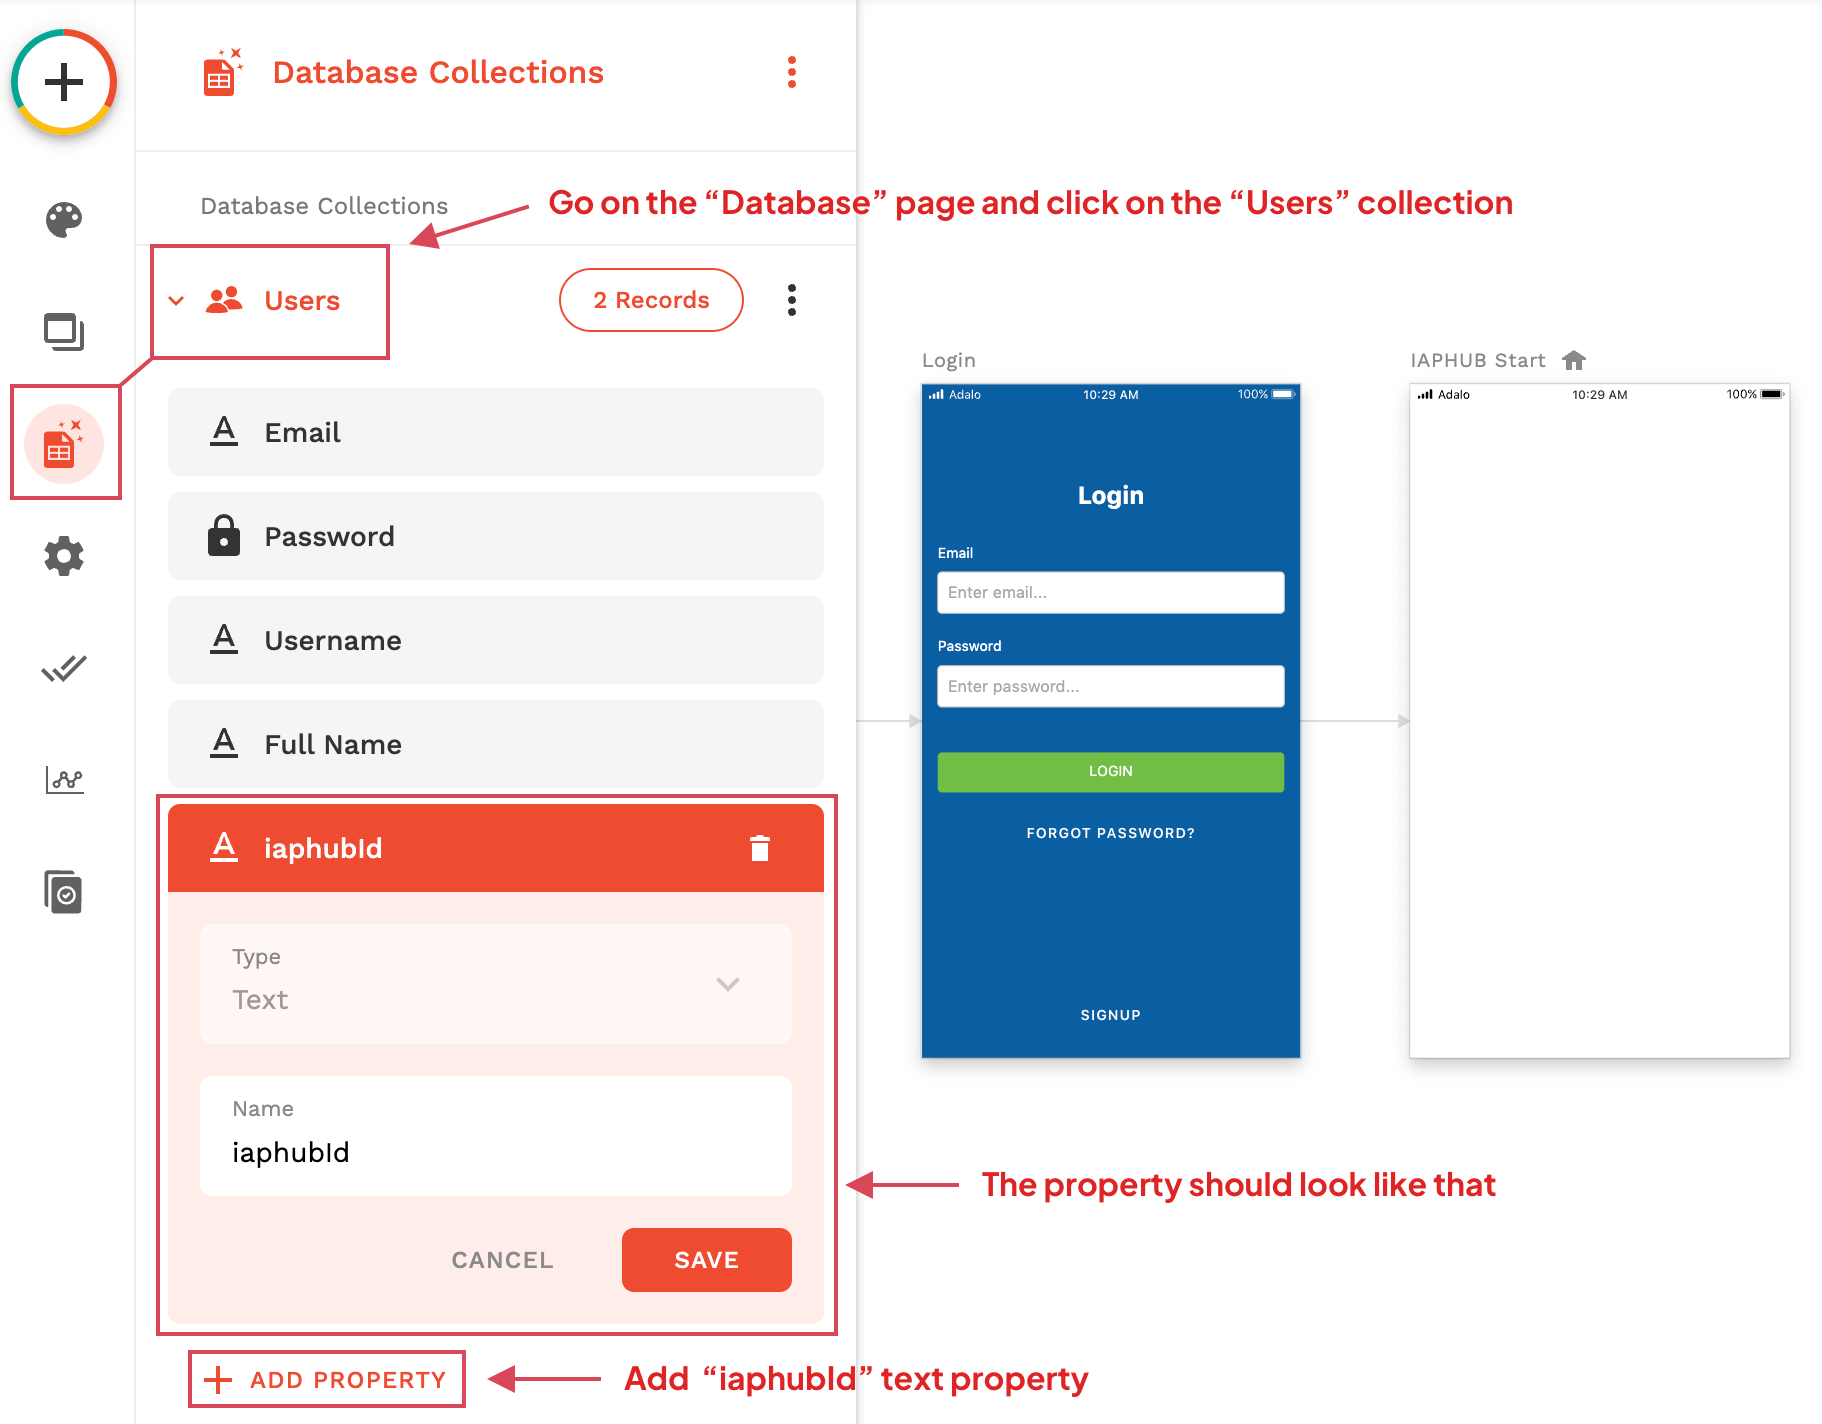
Go to the Database page, click on the Users collection and add a text property iaphubId.
This property will contain the id of the user generated by the IAPHUB component, you'll be able to use this id to search for a user on the IAPHUB dashboard.
Insert IAPHUB Start component
Insert the IAPHUB Start component on your "IAPHUB start" screen.
The component will display an activity indicator, you can modify the color in the "Style" configuration of the component.
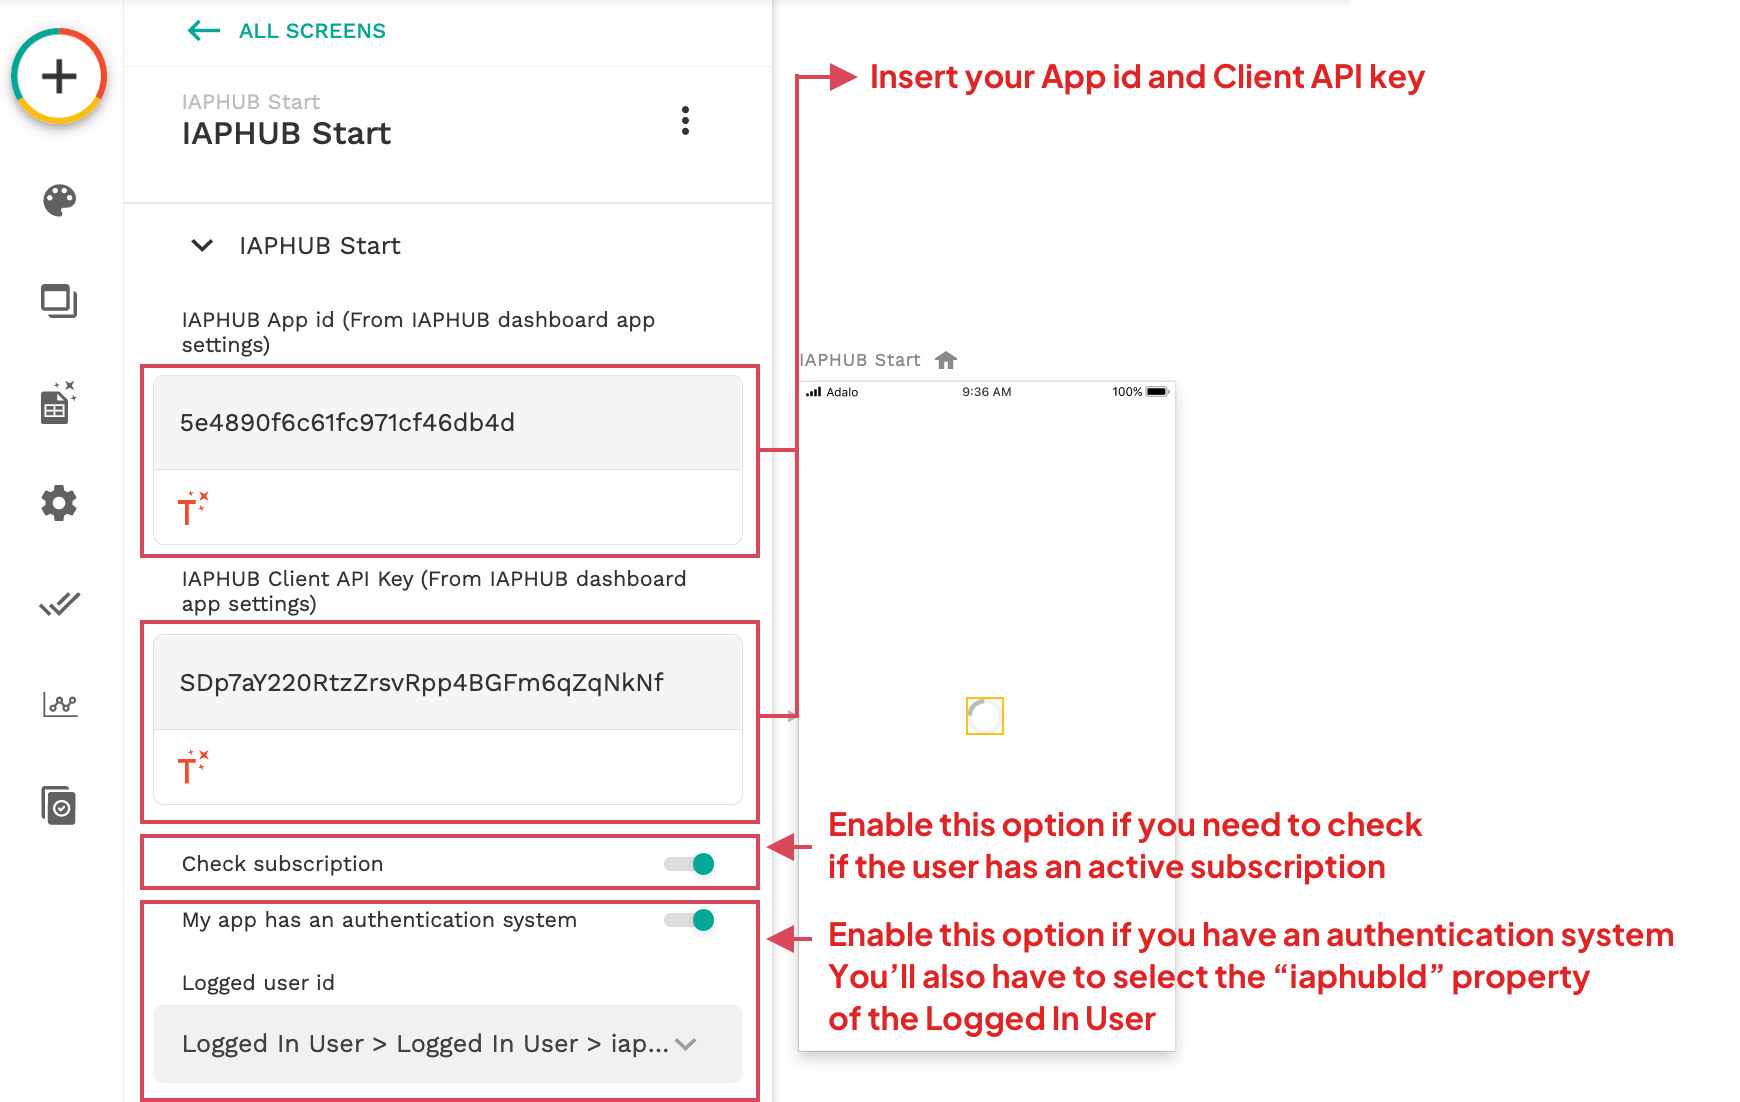
Configure the component by entering your App id and Client API key. The App id and API key are available on the settings page of the IAPHUB dashboard, please make sure to use the client API Key. The server API key should only be used for our server API.
Enable StoreKit V2, as it is the latest version of the payment system available on iOS 15+. Just make sure to configure the App Store Server API.
If you're selling subscriptions and need to check if the user has an active subscription, enable the Check subscription option. Otherwise keep this option disabled.
If your app has an authentication system, you'll also have to enable the option saying that your app has an authentication system and select the iaphubId property you've created in the Users collection. Otherwise keep this option disabled.
Configure IAPHUB Start actions
You should now configure the actions of the IAPHUB start component. The component has three actions:
Action triggered when IAPHUB started successfully
This action will be executed after IAPHUB is started. You should link this action to the next screen of your app.
If you've enabled the Check subscription option, the action will return a boolean parameter Has active subscription that will be helpful to check if the user has an active subscription.
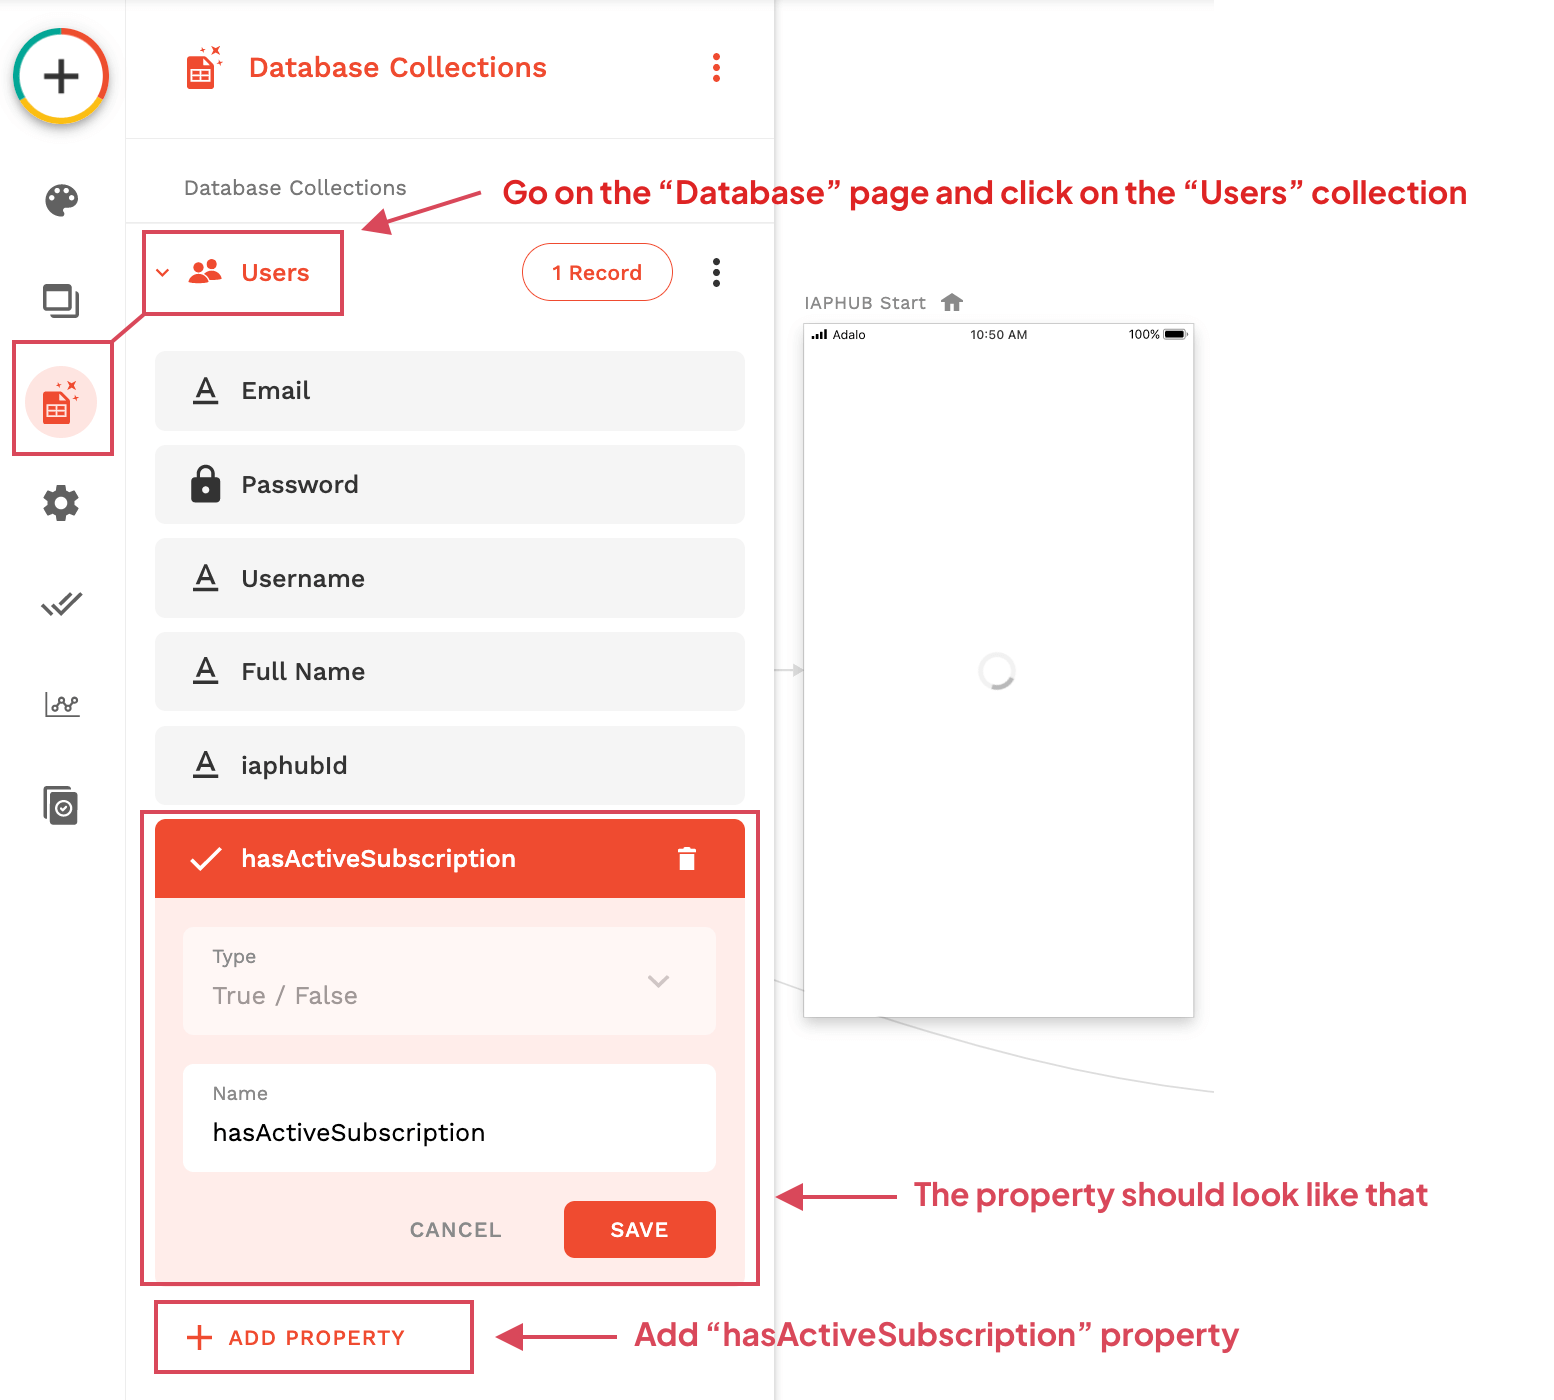
If you have an authentication system, you can easily save the subscription status of the logged user by using this parameter. To do so go to the Database page and click on the Users collection and add a boolean property hasActiveSubscription.
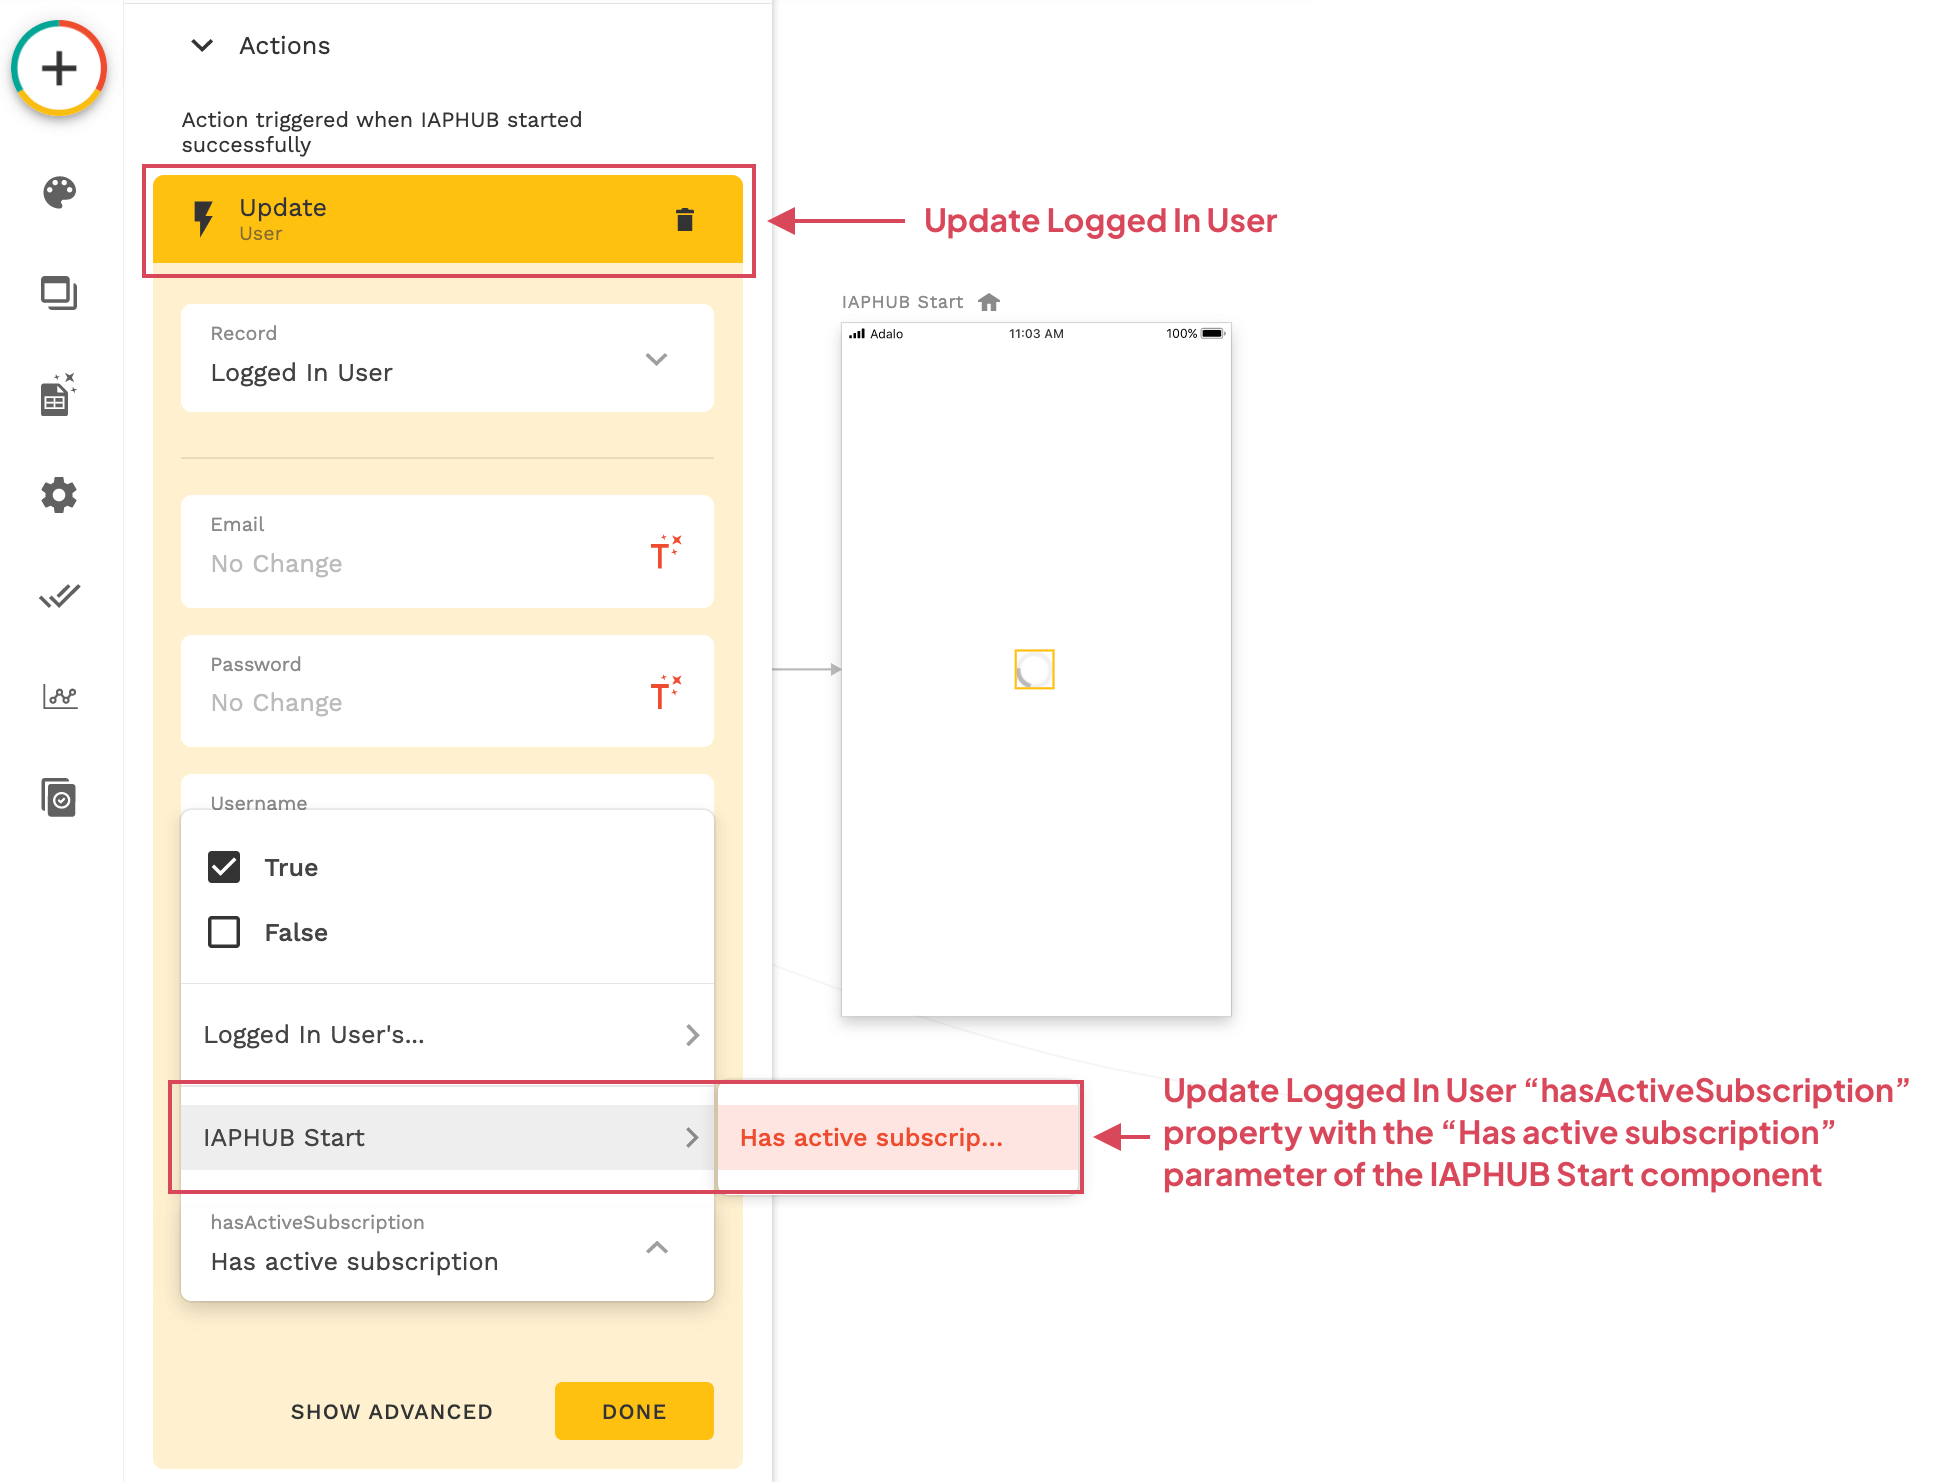
After that you'll just have to add an action and update the Logged In User hasActiveSubscription property with the Has active subscription parameter of the IAPHUB Start component.
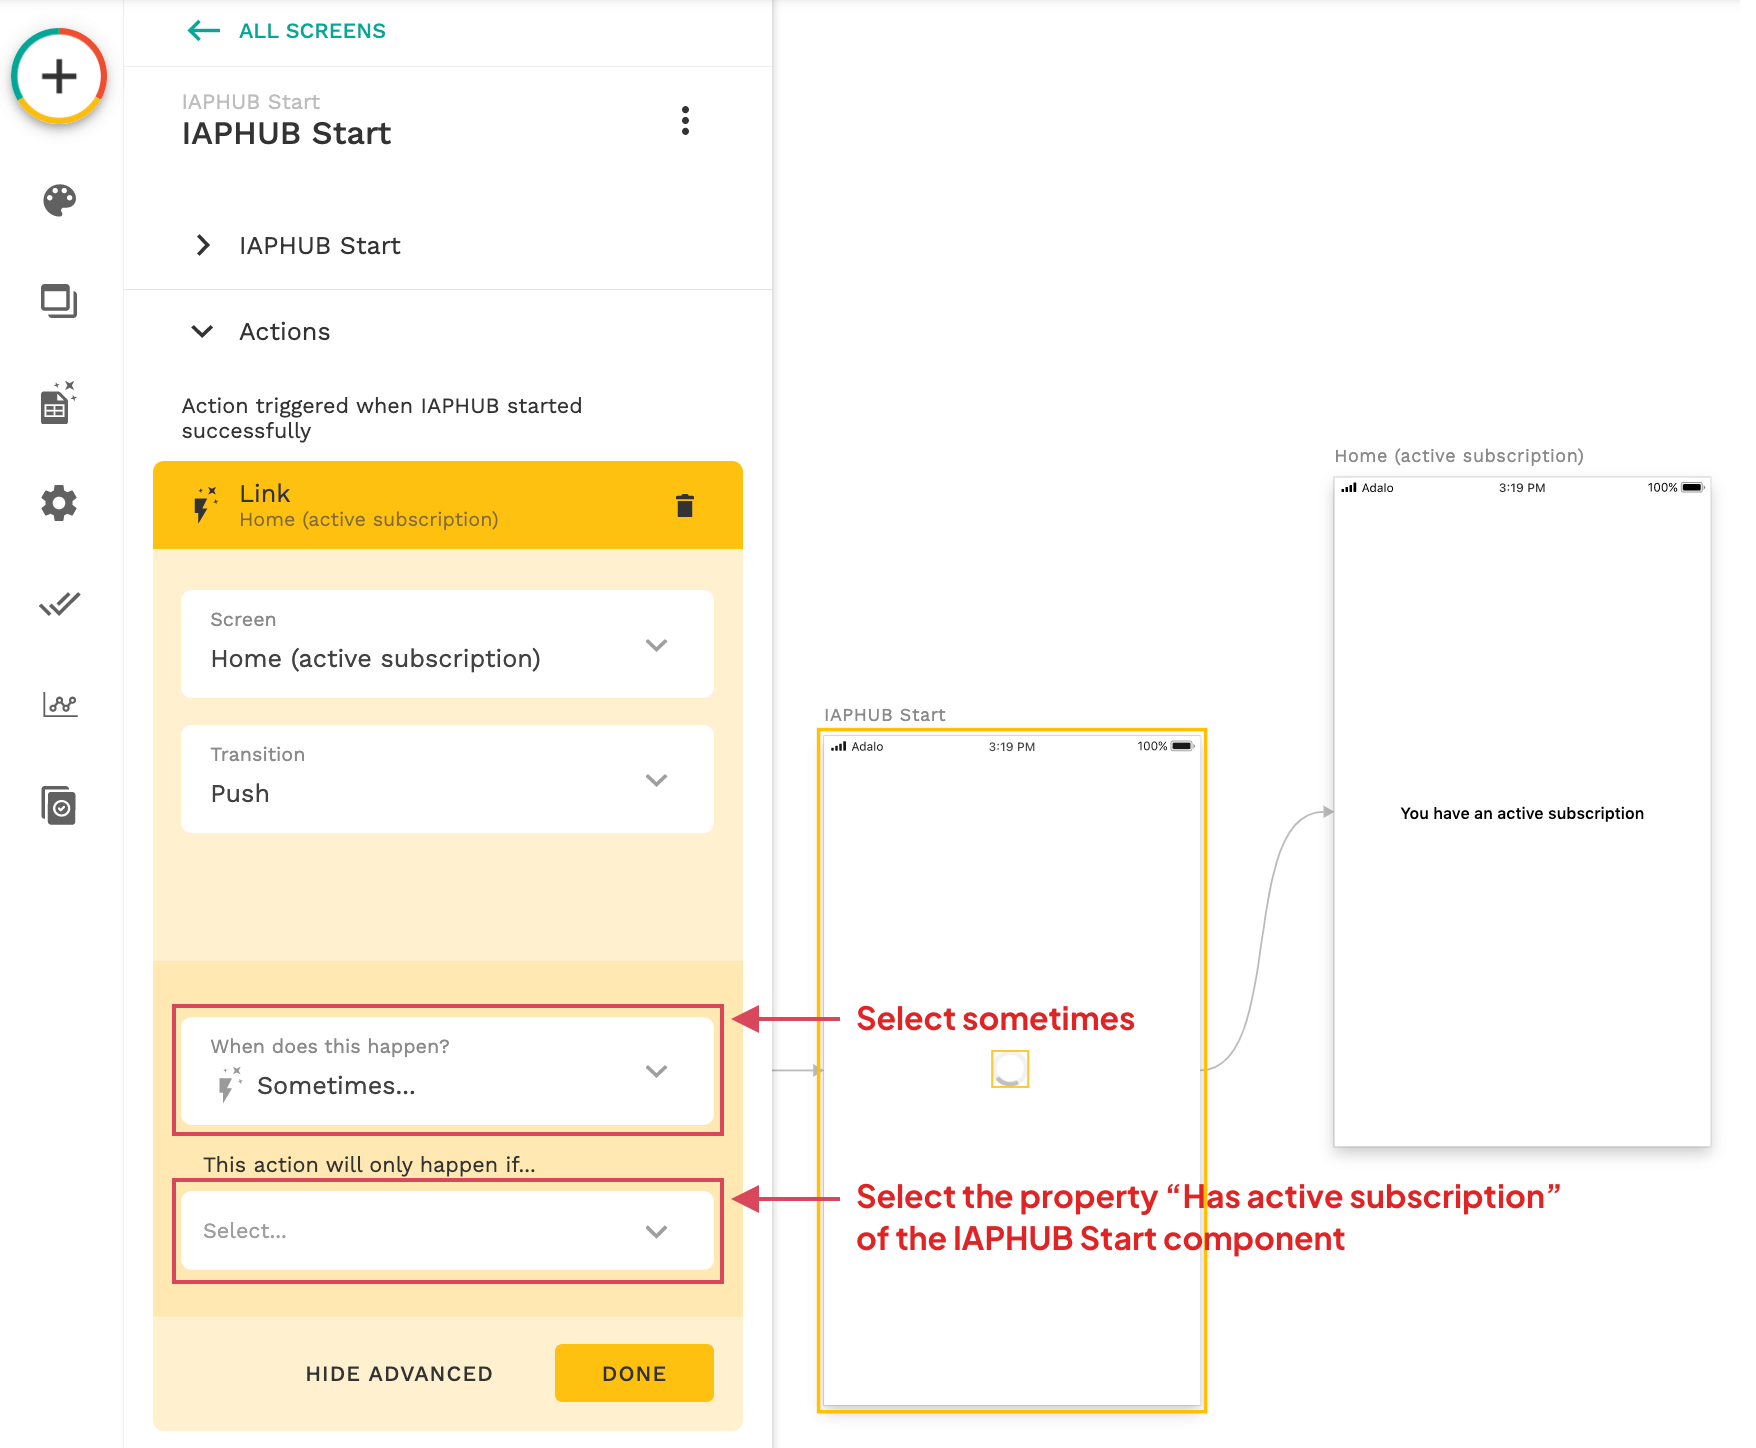
If needed you can also redirect the user to a different screen depending if the subscription is active or not (no authentication system needed). To do so click on the "When does it happen?" option when you create a link. Click on "Sometimes.." and select the property "Has active subscription" of the IAPHUB Start component.
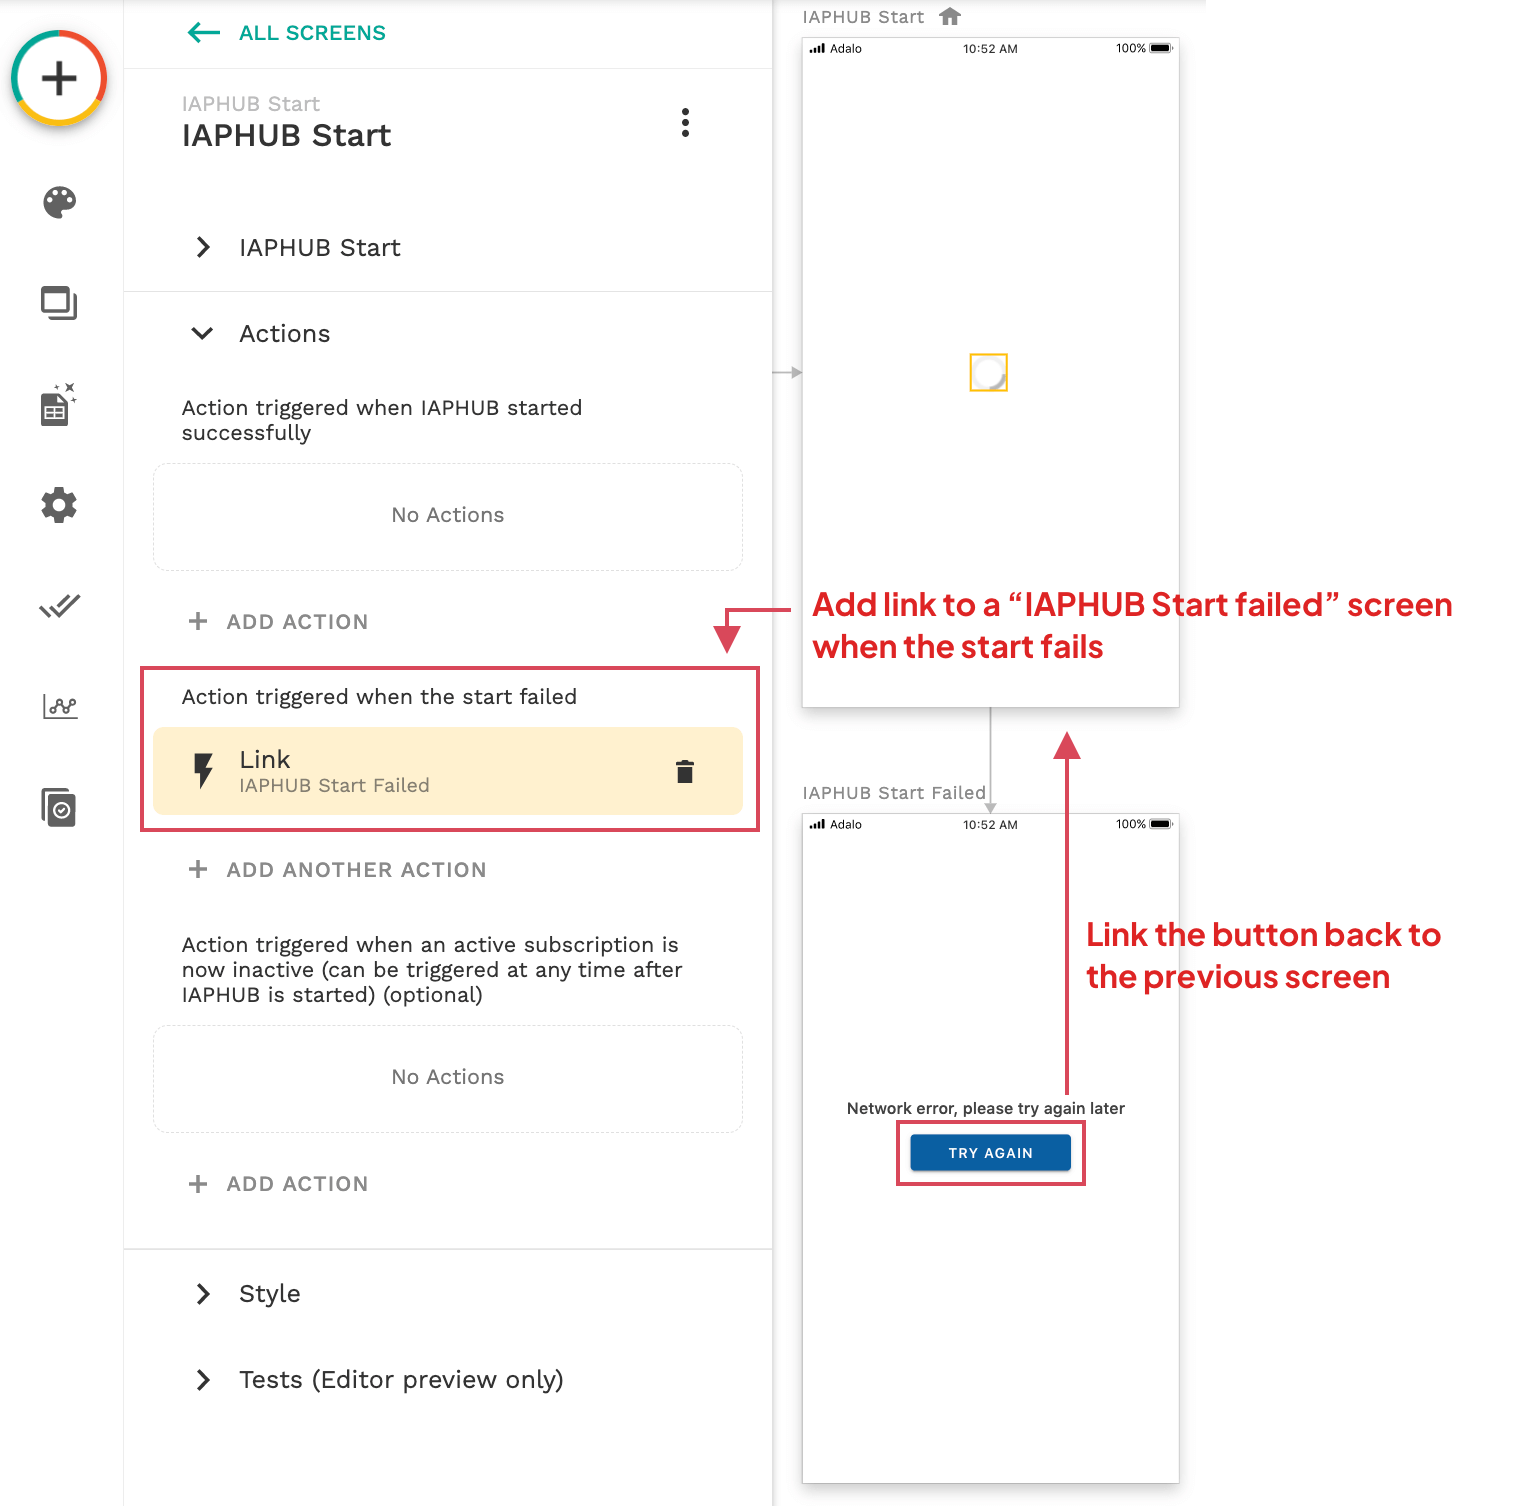
Action triggered when the start failed
This action is executed when IAPHUB couldn't be started because of an error.
There are currently two errors possible:
- IAPHUB has been started on the web (not supported).
- The Check subscription option is enabled and it wasn't possible to check the subscriptions because of a network error.
You should redirect the user to a screen displaying an error message and a button going back to the previous screen (the "IAPHUB Start" screen).
Going back to the "IAPHUB Start" screen will retry the request again.
Action triggered when an active subscription is now inactive
This action will be executed when IAPHUB is already started and an active subscription becomes inactive (most likely because it expired).
Thanks to this action you'll be able to update the status of the subscription (if you have a hasActiveSubscription property on the logged user).
You'll also be able to redirect the user to a different screen (in case the user might be on a screen restricted to users with an active subscription), for example the screen displaying your paywall.
Test implementation
After you've configured everything, you should of course test your implementation is working properly.
One issue you'll have is that the IAPHUB Start will fail when previewing your app on the Adalo editor since it doesn't support the web platform.
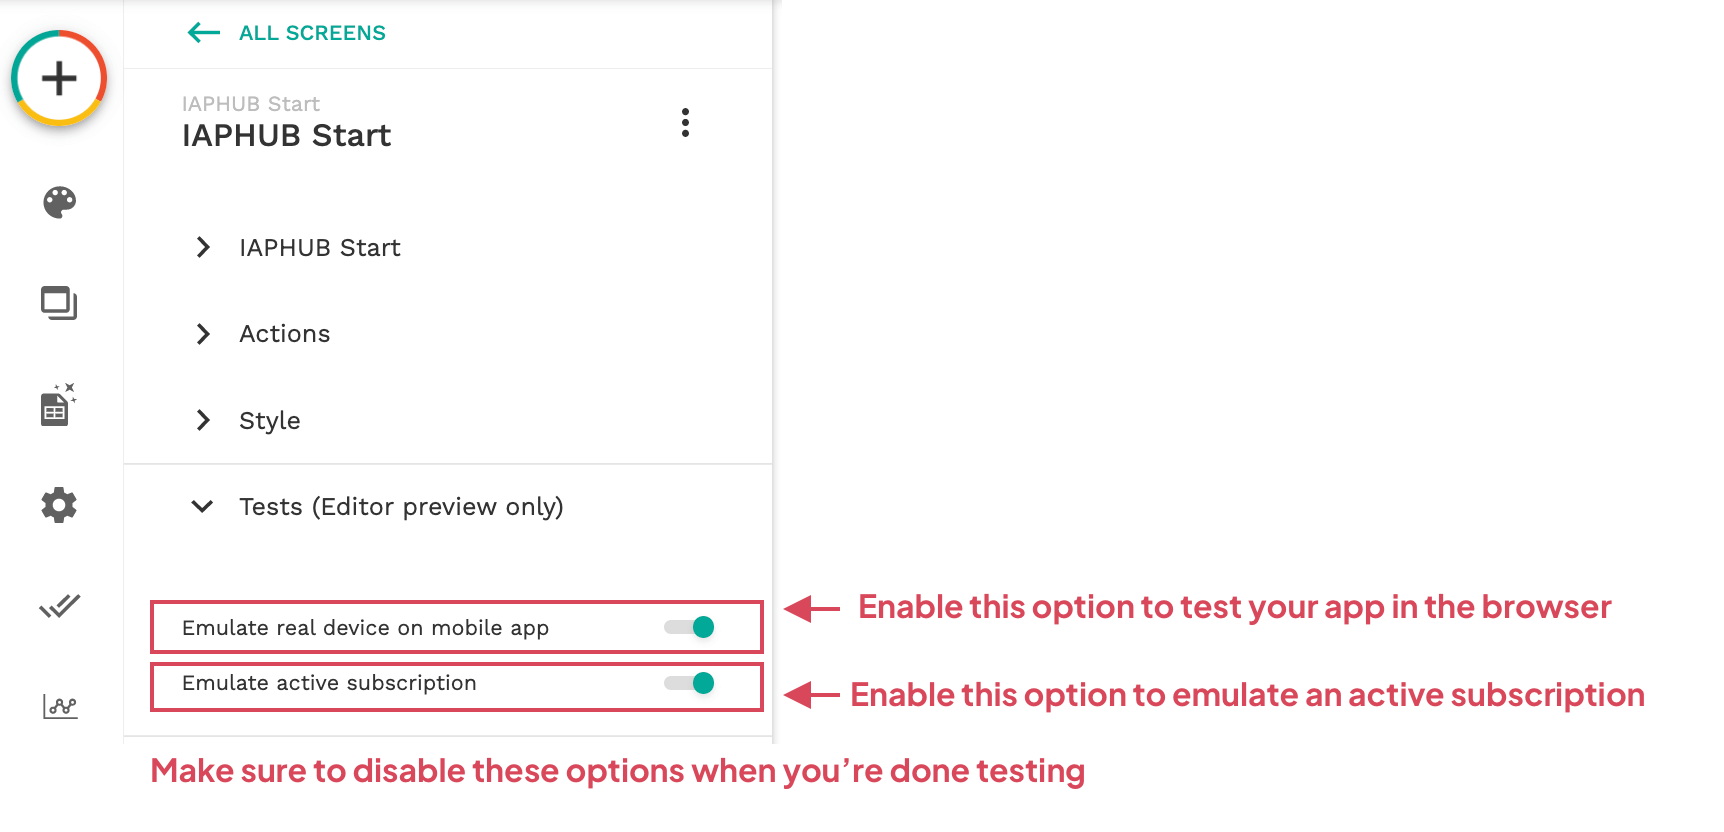
But no worry you can enable the option "Emulate real device on mobile app" in order to preview your app in the browser.
Since it isn't possible to make a purchase in the browser, you can also enable the option "Emulate active subscription" in order to test your app when the user has an active subscription.
Make sure to disable these options when you're done testing.
If you have an authentication system, you should also check that the iaphubId property you've created previously in the Users collection has been successfully initialized (the IAPHUB Start component should generate an id and save it to the collection after it has been started successfully).
In order to do so simply go to the Database page of the Adalo dashboard, click on the Users collection and click on "X Record". If everything is configured correctly you should see an id in the record of the user.
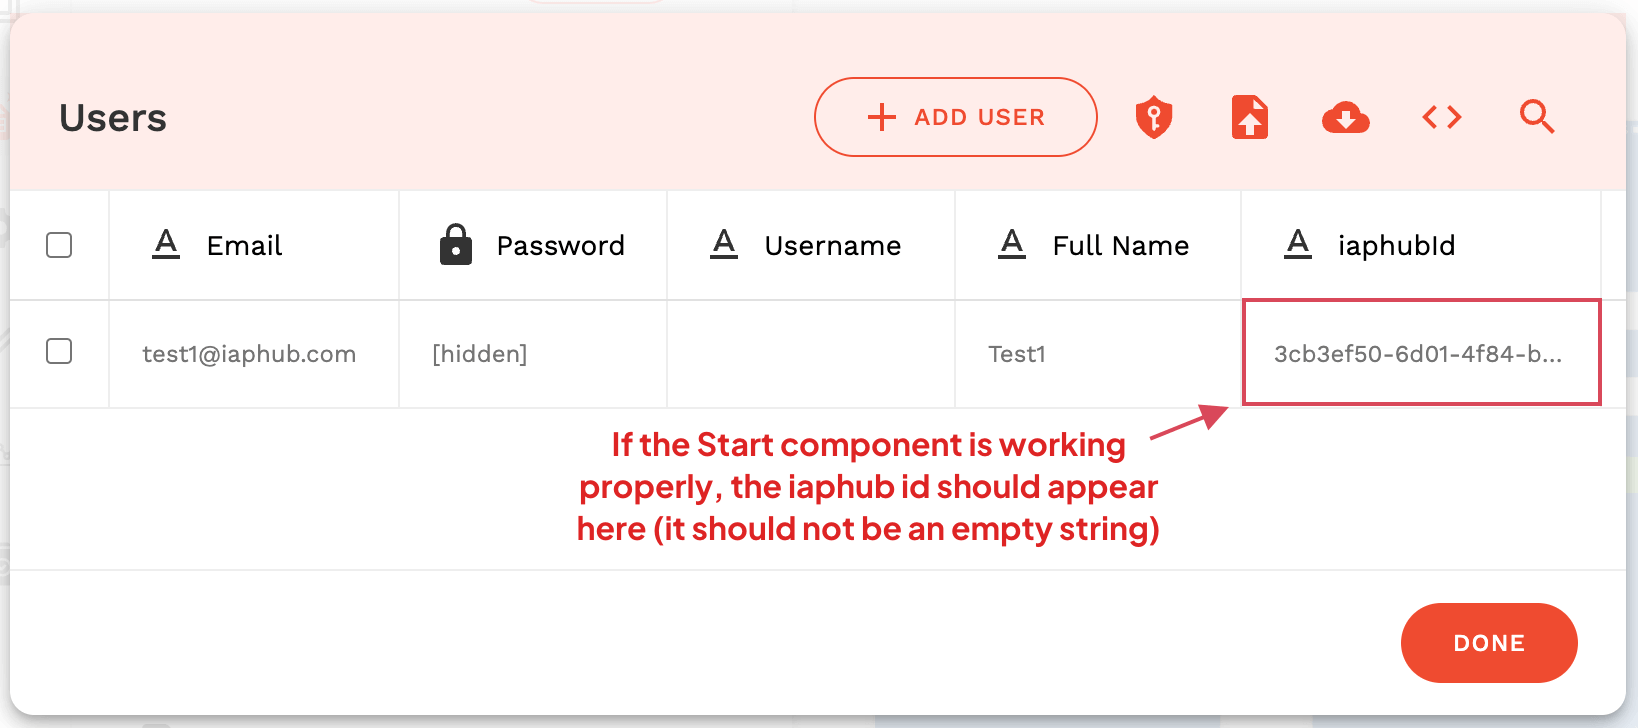
You can use the iaphubId property to search a user on the IAPHUB dashboard.
Next step
The next step is to set up your Paywall, you can find the instructions here.